CREATING FOLDERS IN GOOGLE DRIVE

- Image Credit: ite.org
Most Burlington High School students, like thousands of students across the globe, are using Google Drive on a daily basis. Teachers share files with students and vice versa, making Drive a powerful and efficient tool for a digital workflow. Lately, I’ve been reading many blog posts and watching lots of Google Drive videos targeting educators about how to use Drive and it’s many features. However, I have yet to read a post targeted directly to students offering practical and simple advice on how to leverage Drive to increase productivity and function successfully in a paperless classroom environment. So, like my recent Google post, students; this post is for you!
TIME FOR A CLEAN-UP

- Image Credit: Hoffman Education
Although you may be using Google Drive on your iPad instead of traditional school supplies such as folders and notebooks, unless you are managing and organizing your Drive, you may be faced with a “digital disaster.” A disorganized Google Drive, one with no folders and a place where everything is named “untitled1,” can make locating important files difficult and confusing. While you could simply search for your files, a better strategy, and one which will help you become a more organized student, would be to create folders and assign appropriate names to all files. Sometimes your teacher might tell you what to name a file, but sometimes they won’t. As a student, you must learn how to assign a logical name to a file. For example, if you are reading Lord of the Flies and you are assigned to write an analysis of the main characters, you may name the file “Lord of Flies Character Analysis.” The bottom line is that an increase in your organizational skills will lead to increased productivity both in and outside of the classroom. Disciplined work habits can then be transferred beyond high school, taken with you into college, and eventually into the workplace.
DRIVING IN THE RIGTH DIRECTION

- Image Credit: Michael Ransburg, Flickr
The first step in steering your Drive in the right direction is to create folders for each of your classes. Inside each of these folders you can then create additional folders related to specific units, projects, or assignments. Another suggestion is to change the color of each of your folders. You can change a folder’s color from a laptop or desktop and this is another helpful tip to keep all your digital work organized. The third tip is to move or add each file into the appropriate folder either as you create it, or as it is shared with you. Getting into this habit will ensure your Drive will stay on a straight path. Adhere to this advice and you will avoid any future “digital disasters.”
CREATING FOLDERS IN GOOGLE DRIVE FROM YOUR IPAD:
STEP 1: Select “Add to My Drive” then select “New Folder”
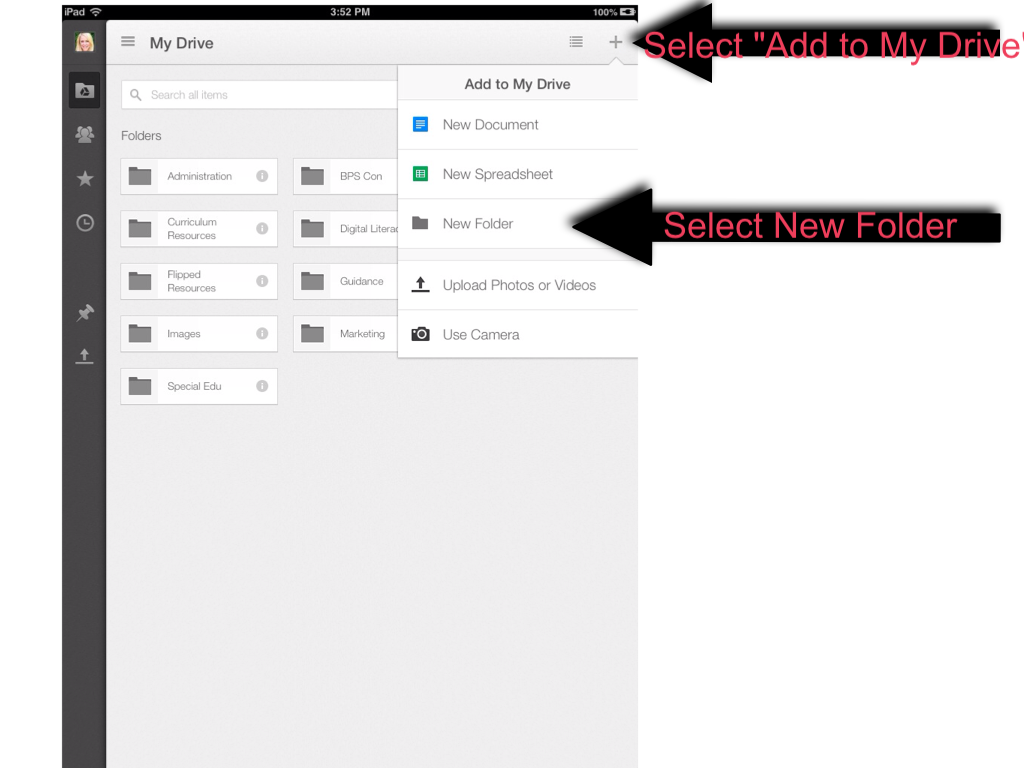
STEP 2: Name your folder (we recommend creating a folder for each one of your classes), then select “Create”

STEP 3: Follow this same process to add additional folders inside each folder you just created. In this example we created “Projects,” “Vocabulary,” and “Weekly Journal” inside the English folder.
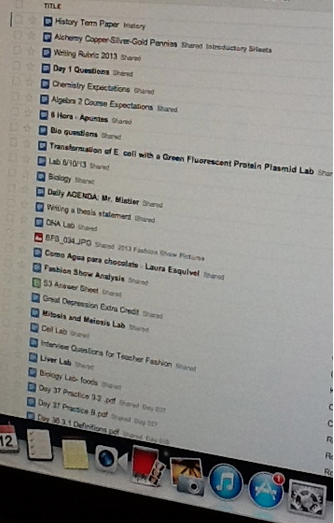
Follow these simple steps and your Google Drive will go from looking like this:
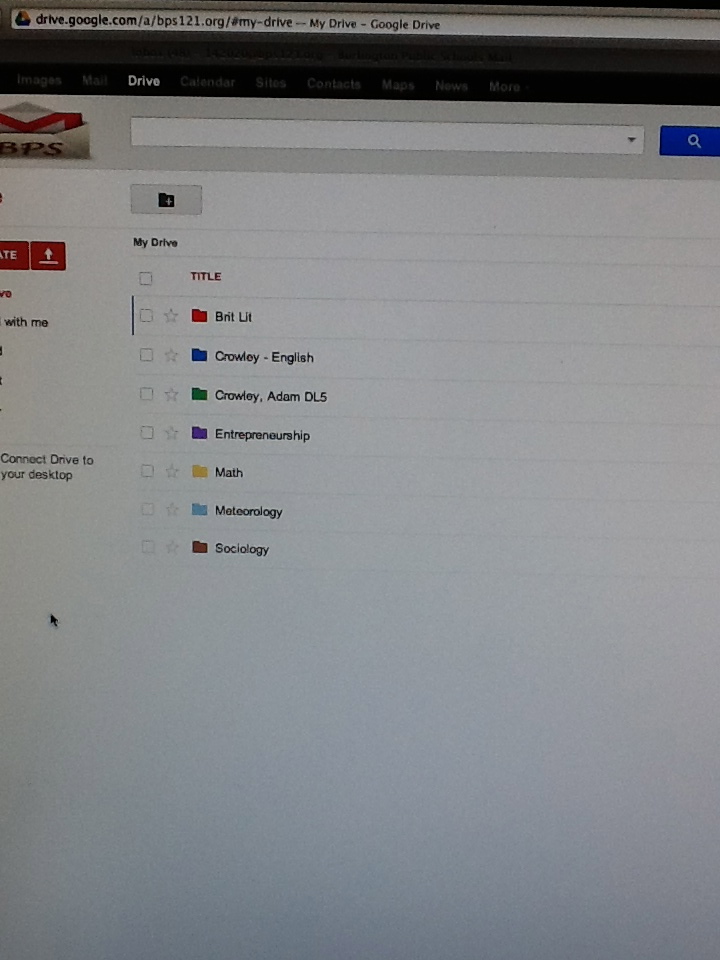
To this:

- Adam helping his classmates organize their Google Drive

