Today, the BPS Edtech Team hosted its first of four summer Edcamps. We are fortunate to have Zaption, a San Francisco based tech startup, sponsoring each of these Edcamps and we are excited about their new interactive video product.

An Overview of Zaption:
“Zaption helps educators turn video into a personalized, interactive learning experience. Teachers can use Zaption’s intuitive web app to quickly add images, quizzes, and discussions to existing videos from YouTube, Vimeo and private video libraries. The result is an engaging “lean forward” activity. With Zaption’s analytics, instructors get real-time feedback and actionable data to track progress towards learning outcomes. The basic version is free and the Pro version offers premium features such as greater interactivity, group management and LTI keys for your LMS.”
The video below demonstrates just how simple it is to create an interactive video lesson using Zaption.
Getting Started With Zaption: Finding Videos
Teachers sign up for a free Zaption account through Facebook, Google, or Edmodo. After signing up, you will be prompted to answer three basic questions (your role, school name, and school type) then you’ll be able to start creating your first video lesson, or “tour.” You can create a new tour from scratch, or you can search for existing tours by keyword that other teachers have already created. Existing tours are housed in the Zaption Gallery. To create your own tour, you first find a video. Once you’ve found the video for your tour, you can begin adding interactive elements.
In the video search box I typed “digital citizenship” and selected the video created by Help Desk alumni Xin Zhang (47,000 views and counting!). Next I selected “add this video to tour.” With the basic free version of Zaption, you can only add one video clip per tour, however with a pro account you are able to add multiple video clips to a tour. Once the video is in the tour, you can select “video settings” to adjust the start and end time of the video.
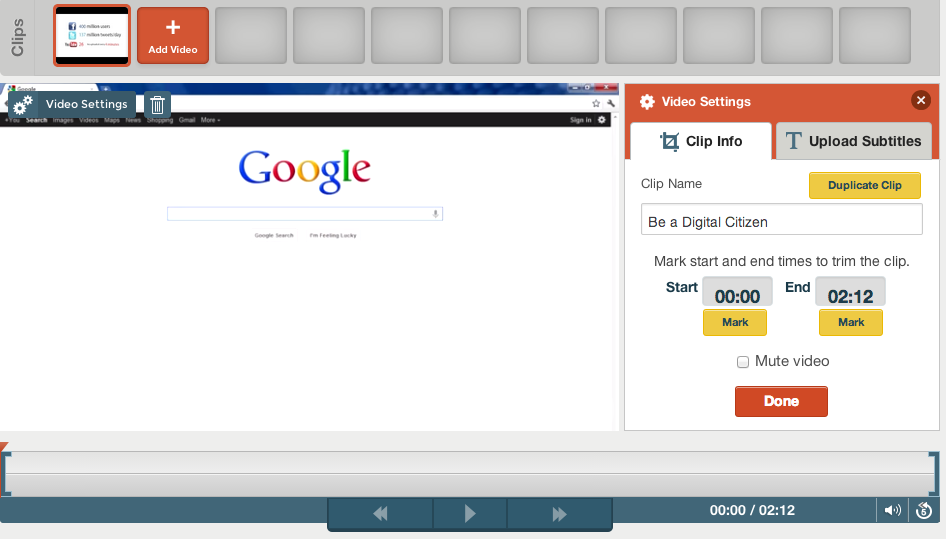
Easily change the start and end time of each video
Creating the Interactive Tour: Adding Elements
To make your video interactive, you simply move the play button to the place in the video where you want the element to appear then drag and drop that element onto the video pane (left) or into the sidebar (right). In the example I created, I asked an open response question near the end of the video and would use this as a formative assessment to gage my students’ existing knowledge of digital citizenship. Once finished building your tour, you hit “submit” and then “share.” You are able to share your Zaption tour with a link which you can copy and paste to your class blog, website, Google Classroom (coming this fall!), Edmodo, or you could Tweet the link or email it to your students. You can check out the simple Zaption tour I created about Digital Citizenship by clicking here.

An example open response question in the Digital Citizenship tour
Powerful Analytics:
Zaption features powerful analytical tools, even in the basic free account. Beyond knowing which questions students answered correctly, Zaption’s analytics help you determine the level of student engagement for each of your tours. Students are able to give each tour a rating (1 to 5 stars) and you can also see how many viewers are either fast forwarding or rewinding each tour. Pro features of analytics include the ability to download a CSV file of all responses as well as the ability to filter responses.
Get Great Support Direct From Zaption:
I highly recommend giving Zaption a try, especially if you use video in the classroom or as part of your flipped lesson strategy. The product is easy to use and the Zaption YouTube channel is filled with helpful tutorials including how to edit a published tour (which I actually had to do but was able to figure it out without watching the tutorial, just click on the gear next to analytics) and how to trim video clips.
Join Us At Next Week’s Edcamp!
We hope you will join us on July 22nd, 29th and August 5th for our remaining Edcamps where you’ll be able to work with Zaption and many other edtech tools. There is still time to register and you may do so by registering through Eventbrite. If you missed today’s session, you can access the list of edtech tools that we discussed by clicking here.Last but not least, make sure you stay connected with your fellow Massachusetts educators by joining the official Massachusetts Google Educator Group!

