Padlet, formerly known as Wall Wisher, is a device agnostic, interactive technology tool and is an excellent way for students to share multimedia presentations not only with their classmates and teacher, but with a global audience. Students simply copy and paste the URL of their presentation to the Padlet wall and the teacher can then share their work “gallery style” across many social networks including Twitter, Facebook, Google+, Pinterest, Tumblr, or LinkedIn. Padlets can also be embedded into a class blog or website (requires a self-hosted WordPress blog with the Padlet Shortcode Plugin). Love QR codes? Padlet will auto-generate a QR code as well. The best part about Padlet is that it doesn’t matter which technology tool students use to create their presentation, making it the perfect option for a 1:1 iPad classroom.
Whether students create presentations using Google Slides, Haiku Deck, Adobe Voice, TouchCast, Prezi, Explain Everything, Flowboard, Glogster, and so on, their presentations can be showcased on the wall. When students are ready to present, they can click directly on their presentation, make it full screen, and begin their talk. This method of presenting is a huge time saver in the classroom. There’s no switching devices, no logging in and out, and presentations flow seamlessly from student to student. The integration of Padlet allows for more presentations and teacher and/or student feedback to be given per class period. Additionally, because the wall can be made public, parents can view the presentations from a class blog or website or the teacher can email parents a link. Sharing the digital creations of students contributes to a stronger home/school connection.
To get started with Padlet, follow these steps:
1. Create an account by signing into Google. (Check out the new Padlet Chrome Extension if you use a Chromebook)

2. Click on “Create New Padlet”

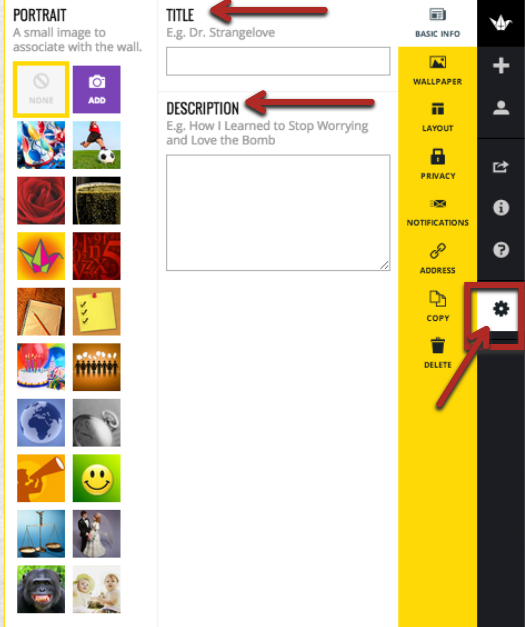
3. Your wall will be created and you will be taken to a “blank canvas.” At the bottom of the wall you will see an orange bar that says, “double click or drag a file anywhere to post something.” This is what your students will do when they are ready to post their presentation links. Prior to this, it is recommended to customize your wall, which only takes a few minutes. You can name and describe your wall, customize the wallpaper, the layout, and privacy settings. Customization can be done by clicking on the gear icon at the bottom.
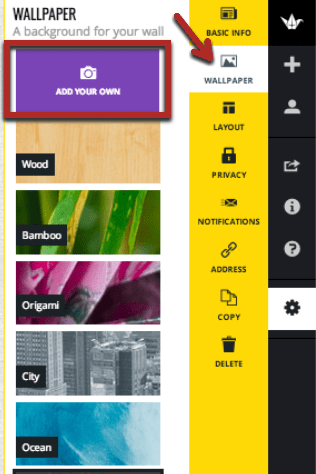
4. Padlet provides a variety of preset wallpaper for you to choose from, or you can select your own photo as the background of your wall. A class photo, the cover of the novel your students are reading, or an illustration by a student gives your wall a personalized touch. Again, if sharing student work with parents, this might be something to consider. Of course you always want to abide by your school’s AUP if sharing student photos or information.
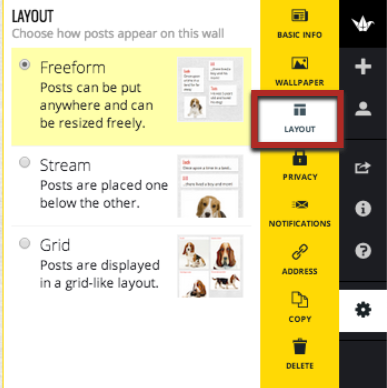
5. There are three layout choices for how posts appear on your wall. Freeform allows posts to go anywhere and can be easily resized. The stream layout allows posts to be placed below one another and grid posts are displayed in a grid-like layout. The grid layout is recommended if you are going to have a lot of posts and wish to keep your wall organized and aesthetically pleasing.
6. Teachers have full control over the privacy and visibility features in Padlet. The default visibility of a Padlet wall is “hidden link” which means the wall will have a public link, but the link is hidden from Google and public areas of Padlet. Other options include private, password protected, and totally public. Teachers can also add people via email and give them more control over the wall. If you wish to use Padlet for a class discussion and want to moderate posts before they are public, you will select “moderate posts” which allows you to approve posts before others see them (ideal for certain types of class discussions). Finally, teachers determine if students can write, view, or moderate posts on the wall. Once all the visibility selections have been made, the teacher will select “submit” to save changes.

Once your wall is ready to be sent to your students, I’d recommend posting the link in your Google Classroom, Edmodo, Canvas, etc.
If you’d like assistance creating your first Padlet wall, please visit the Help Desk or send me an email to schedule a time to meet and discuss ways you can use Padlet with your students. There are many ways, beyond creating a presentation gallery wall, to use Padlet including: book reviews, gathering feedback, reflections on learning, and discussion and debate. Note that students don’t need accounts to post to the wall and that they are allowed up to 150 characters for each post.

Pingback: Create a Digital Gallery of Student Work with Padlet for iOS | Burlington High School Help Desk