Inserting a table of contents into a Google doc is not only easy; it’s an excellent way to quickly navigate to a specific section of a lengthy document. There are many use cases for a table of contents and one example that’s applicable to many high school teachers would be adding a table of contents to a course syllabus. Additionally, multi-page docs explaining long-term projects, DBQ’s (document based questions for AP World and US History courses), or term papers for English and History also lend themselves to using a table of contents.
To insert a table of contents into a document, follow the steps listed below:
1. Ensure the sections of your document that you wish to appear in the table of contents are formatted with a heading style. To do this, go to the format menu, select paragraph styles and then choose from one of six heading styles for your document.
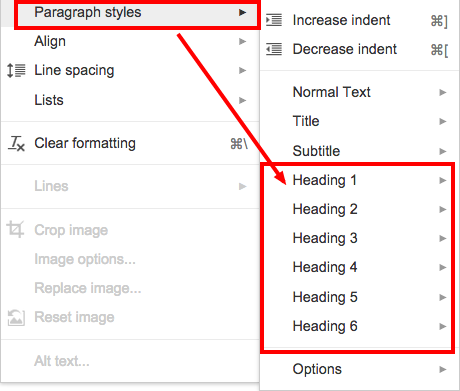
Choose from six different heading options
2. Once each section of your document is formatted with the heading style of your choice you are ready to insert the table of contents. To do so, position your cursor where you want the table of contents to appear. Next, go to the insert menu and select table of contents (last choice on the menu)
3. Your table of contents will appear where your cursor was positioned. Should you wish to make any changes to the text in your table of contents, do so manually within each heading in the body of the document. Navigate to the table of contents, hit the refresh button, and the manual edits will be applied.

Hit the refresh button to update your table of contents
Remember, the next time you are distributing a lengthy document to your students, add a table of contents. They will appreciate having the ability to go directly to the section of the document they need. Likewise, this is an excellent feature to add to your docs if you share assignments with parents through Edmodo or a class website or blog.
Please visit the Help Desk if you have any questions about this, or any other features of Google docs, sheets, slides, or Drive.
